Howdy CalPals! Lately I’ve been on a bit of a Zapier kick lately—exploring different creative workarounds and solutions that can be configured using our integration with the application.
For some background, Zapier allows you to connect Calendly with thousands of apps, including Google Apps, RingCentral, Redtail CRM, and more.
This week, I came across a solution for creating recurring events triggered by Calendly-booked events.
Problem: At this time, Calendly event types only support the creation of a single calendar event per booking and cannot create recurring calendar events.
Solution: Using our integration with Zapier, you can automate the creation of a recurring calendar event triggered by the booking of your initial Calendly-created event.
Who Can Use This?
Calendly’s integration with Zapier is available to users on our Standard, Teams, and Enterprise plans, as well as the legacy Professional plan.
Note: Some of the Zapier functions referred to in this workaround are only available on paid Zapier accounts.
Who would this workaround be useful for?
📚 Private instructors who want new students to be able to select a lesson time using Calendly, but want to meet on a weekly basis at that time going forward.
🤝 Customer relationship managers (CRMs) who want to use Calendly to book intake/discovery calls with new clients, and want a reminder in their calendar to follow up on a monthly basis going forward.
📆 An organization running a multi-day event in which all attendees will be present for all days.
Setting up the Zap
For this example I’ll be using Google Calendar. I will also be using a Calendly account that has already been connected with Zapier. If you haven’t yet, please see here for instructions on how to connect your Calendly account with Zapier.
- Before we start, you will want to book a test event using the event type we’ll be working with for this workaround. This will come in handy later on when we’re testing our “Zap”.
- I recommend booking the test event with an email address you have access to that is not your “add to calendar” email.
- I recommend booking the test event with an email address you have access to that is not your “add to calendar” email.
- From your Zapier account, click + Create and select Zaps.
- Click Trigger from the zap drafting board and search for or select Calendly.
- Set the Event as Invitee Created.
- This will trigger the zap whenever a new meeting is booked in your Calendly account.
Click Continue.
- This will trigger the zap whenever a new meeting is booked in your Calendly account.
- Confirm the Calendly account connected to Zapier is correct, and click Continue.
- Set your trigger scope and click Continue.
💡 Tip:
- The user subscription scope only triggers the webhook for subscribed events that belong to the specific selected user account. This is the option I have selected for my test.
- The organization subscription scope triggers the webhook for all subscribed events within the organization. You must be a Calendly organization owner or admin in order to be able to use the organization scope.
- Click Test trigger to test your trigger.
- Note: Zapier will pull the most recent non-canceled event data. This is where that test event from before comes in handy. We wouldn’t want to accidentally send a test calendar invitation somewhere we don’t want later on in the process!
- Note: Zapier will pull the most recent non-canceled event data. This is where that test event from before comes in handy. We wouldn’t want to accidentally send a test calendar invitation somewhere we don’t want later on in the process!
- Review the record pulled. If the data is accurate, click Continue with selected record.
Filtering the Zap
Note: Zapier’s filter function is only available on paid Zapier accounts.
- If you’re on a paid Zapier plan, you can configure a filter as your first action. Because it’s possible you will only need this zap to work for some of your event types, we’re going to add a filter.
- To filter by event type, select Event Type Name from the available variables under “Only continue if…”
- Then select “(Text) Exactly matches” and type in the title of your desired event type(s).
Click Continue to test the filter. If your test is successful, click Continue again.
Configuring the Action
- Now for the main action, the recurring calendar event. Search for or select your desired calendar provider. I’ll be using Google calendar for my demonstration.
- Once you select your calendar type, you’ll need to let Zapier know what you want it to do. For this workaround, we’re going to select Create Detailed Event, then click Continue.
- Next, you’ll want to connect or select your desired calendar account, then click Continue.
- This is where you’ll be able to get creative according to your specific needs.
💡 Tip: Use your Calendly variables to maximize the automation process when configuring your Summary (event title), description, location, start/end times, and attendees.
Won’t this send a duplicate calendar event for the first meeting? Astute observation! Yes— As is, this workaround would result in two events at the date/time of the first meeting occurrence.
If you’re on a paid Zapier plan, you can use the Format data tool when selecting the start and end times of your event.
Click below to expand for more info on how you can utilize the “Formatter” paid feature of Zapier to create the first Zapier-generated recurring calendar event after the initial meeting booked with Calendly.When selecting the variable for start and end time, select Format data.
This will allow you to tell Zapier to create the first occurrence of the recurring event one week after the initial Calendly-generated calendar event.
In the example below, I have asked the formatter to create the first Zapier-generated event one week after the initial event on February 7th.
I repeated the same for the end time.
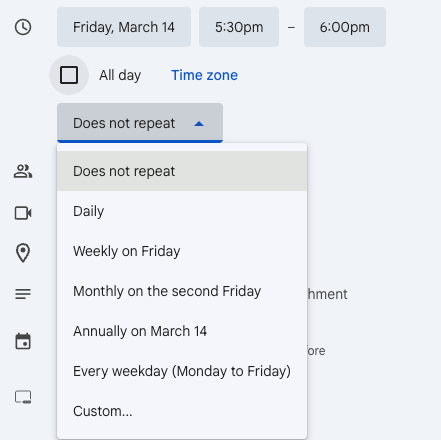
As you can see, the formatter has successfully adjusted the start and end times to be on February 14th. - To be sure your Zapier-generated calendar event will repeat, make sure to set your repeat frequency accordingly.
- If you wish for these recurring events to be seen as conflicts by Calendly, be sure to set the visibility as “Busy”.
- When you are satisfied with the configuration of your settings, click Continue.
- Now comes the time when starting with a test event is crucial if we don’t want to accidentally send a previous invitee a test calendar invitation. Go ahead and test out the zap by clicking Test step.
- Zapier will send a test event to your calendar and to the calendar of the invitee from your test event.
- Zapier will send a test event to your calendar and to the calendar of the invitee from your test event.
- If all appears as it should with the test events in your external calendars, go ahead and click Publish.
- The final step, and the one I almost forget constantly— give your zap a name! In the upper left corner of the zap editor, click the pencil icon to update the name of the zap, and you’re all set!
What if I don’t use Google Calendar? A similar zap can be created using any of Zapier’s available connections with other Calendar apps. Feel free to check Zapier’s App database to see what’s available.
Is Calendly ever going to build in a recurring event feature? It’s definitely something we’re looking into and collecting feedback on. No promises or timelines, but definitely on our radar. Be sure to let us know about your use case as every bit of context helps!
Hope this helps! Feel free to let us know how you’re using the Zapier integration, or if you have any questions!


