

One of the questions we get asked quite a lot about here on Calendly Community is “How do I handle no-show invitees and follow up?” Since Calendly currently doesn’t have a built in workflow for this, we’ve got to get creative!
Problem: Marking an invitee as a no-show prevents them from receiving scheduled post meeting workflows (as intended), but there isn’t a way to trigger a separate no-show follow up at this time.
Solution: Using a combination of Calendly, your favorite spreadsheet application, Zapier, and email service, you can configure an external no-show follow-up automation process. For this example, we’ll be using Google Sheets and GMail.
Who Can Use This? The Zapier integration is available on all of our paid plans. The suggested Zapier workflow only works on a paid Zapier plan as well.
How does this work? The workflow we’re about to set up in the steps below has 3 parts to it.
- The first part (the trigger) uses a Zap to monitor a Google Sheet for new rows. New rows are added to the spreadsheet by importing a .csv file from your Calendly’s Scheduled Events page.
- The middle part (the filter) uses a built in Zapier tool to check each new row for entries that meet specific criteria which in this scenario is when “Marked as No-Show” is “Yes. If a row meets the criteria, it continues on to the last part of the Zap.
- The end part (the action) wraps up the Zap workflow. If a row has a “Yes”, the Zap sends an email communication to the invitee through your email populated with a subject and body you’ve written.
Setup the Google Sheet
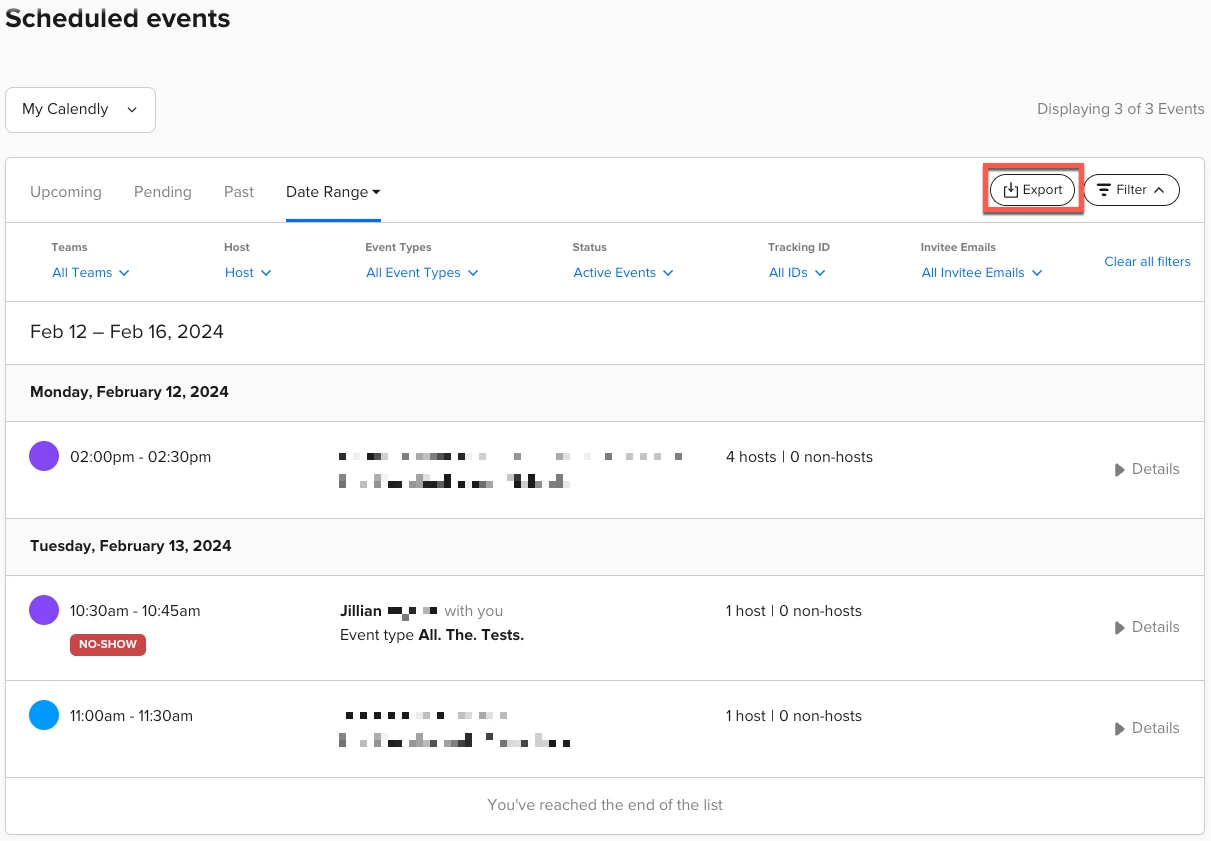
- Go to your Scheduled Events page.
- Click on the “Past” tab or select a specific date range in the past using the “Date Range” tab.
- Feel free to add any filters using the “Filter” button.
- Click on the “Export” tab to export a CSV file. Unzip the file if needed before proceeding. Google Sheets can’t import a .zip.
- In Google Sheets, import the file by going to File > Import > Upload > Browse and selecting the file. Click “Open”.
- For this first import, select “Replace Spreadsheet” and then click “Import Data”.
- Remove all data below the header except for one row.
- Modify that one row to be your test row. Change all email addresses to an email address you can use for testing (preferably your own email address). Change “Marked as No-Show” to “Yes”.
- Duplicate that row and modify this one to have “Marked as No-Show” as “No”.
- For this example, rename the spreadsheet (file name) to “No Show Workflow” and the sheet to “Scheduled Events”.
Setup Zapier Workflow
- In Zapier, create a new Zap.
- Select Google Sheets as your trigger application.
- For the event, select “New Spreadsheet Row” and click “Continue”.
- Choose your account. Depending on whether or not you’ve used Zapier and Google Sheets before, you may need to connect your account. Click “Continue”.
- Select your spreadsheet “No Show Workflow” and worksheet “Scheduled Events”. Click “Continue”.
- Test trigger to bring in data. Pick your “Yes” test record and click “Continue with selected record”.
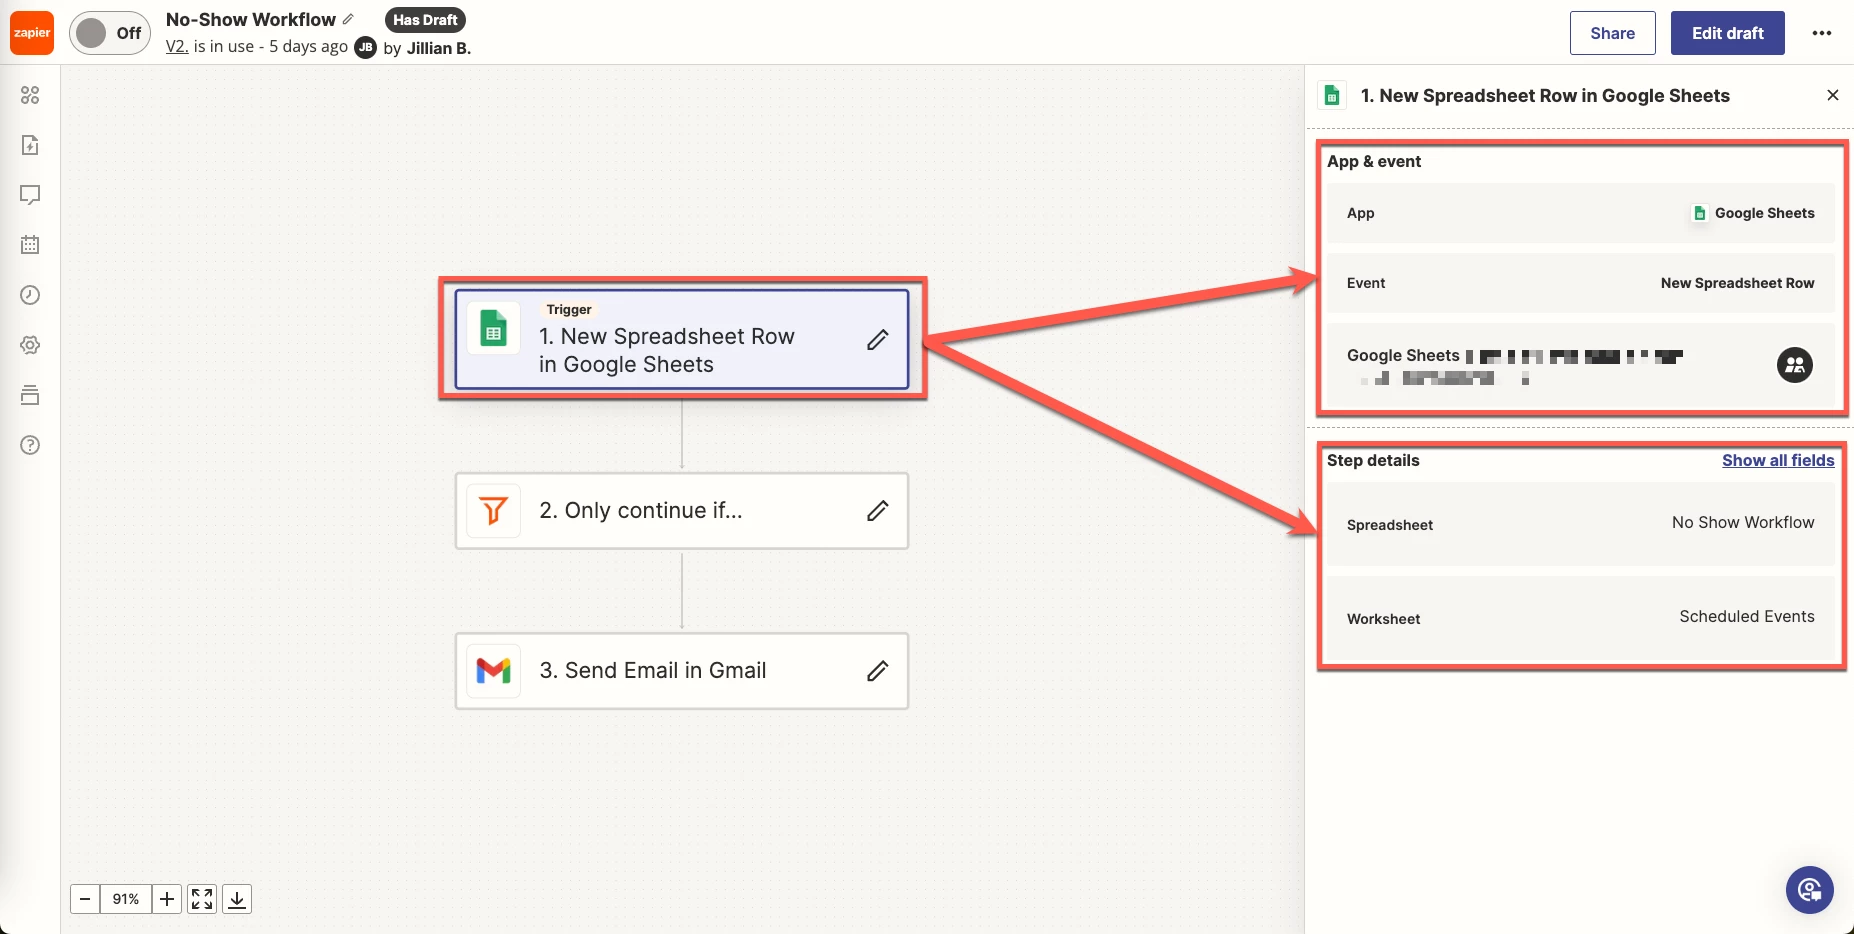
Settings and fields for Google Sheet trigger - On the screen that appears, select “Filter” from “Built in Tools”.
- Under “Filter Setup & Testing”:
- Choose Field = Select field “Marked as No-Show”
- Choose Condition = (Text) Exactly Matches
- Enter Text or Insert Data = Yes (note: The word “Yes” with no quotes.)
- Next screen will indicate the Zap would have continued for this test data. Click “Continue”.
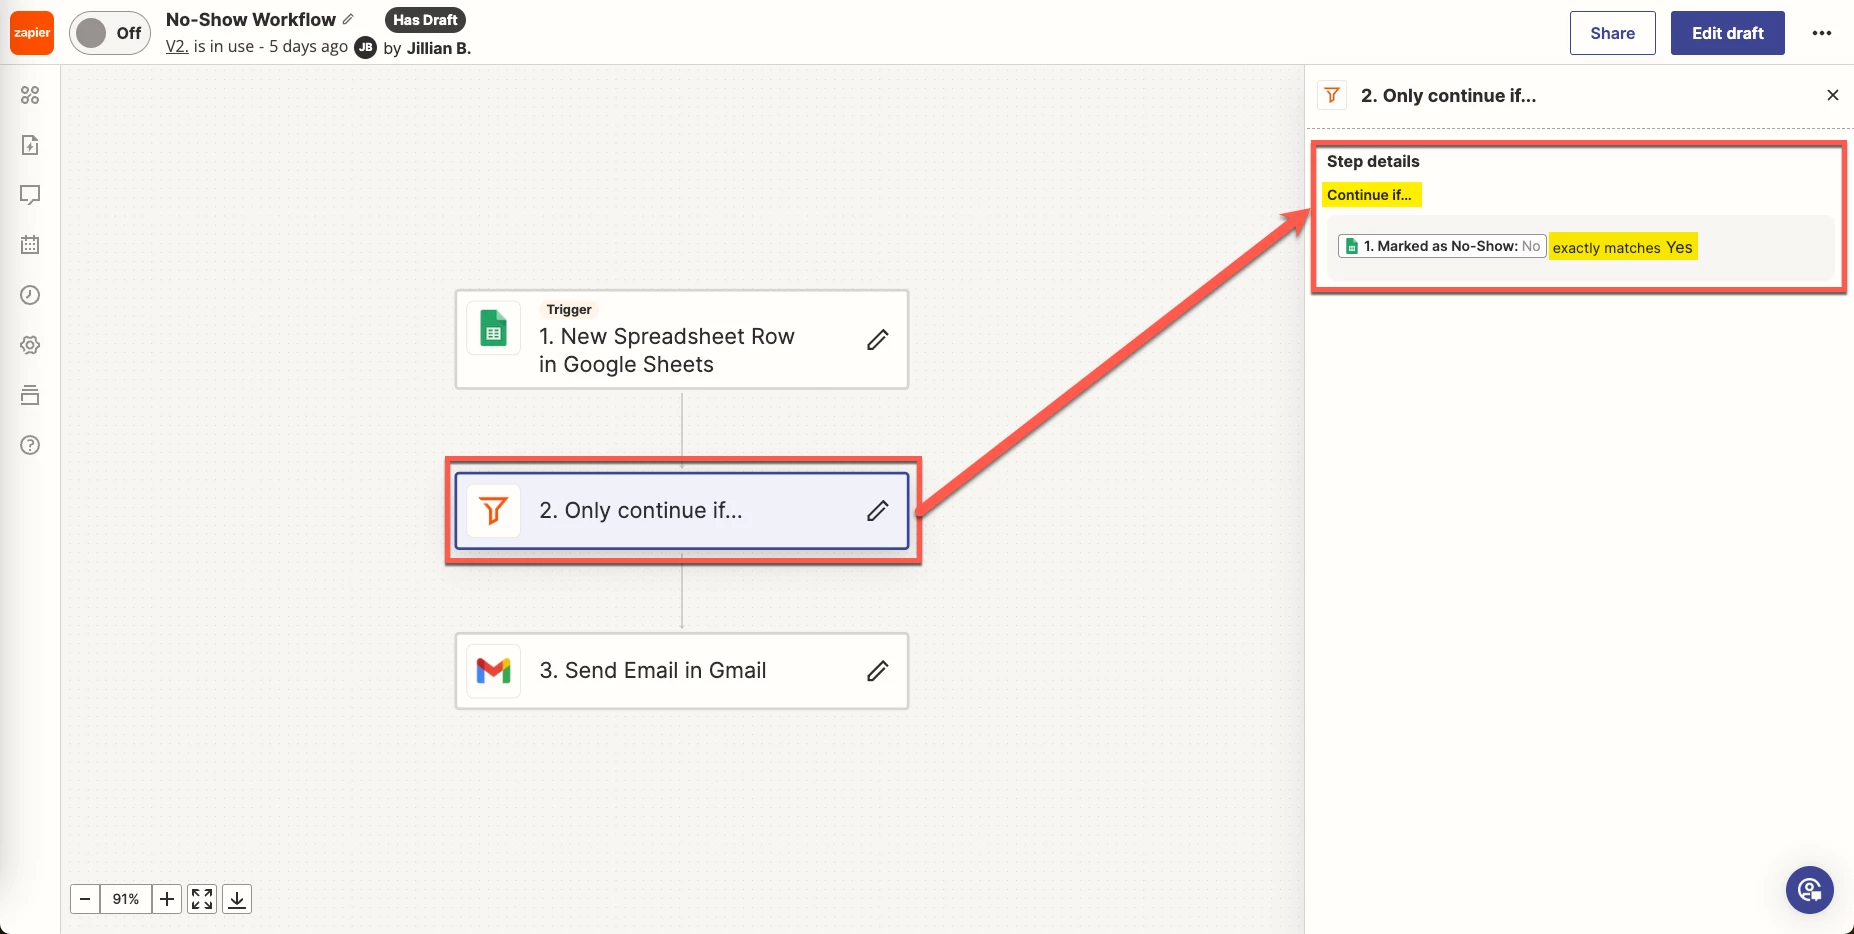
Settings and fields for Filter step. Pay close attention to ‘Continue if...’ and ‘exactly matches Yes’! - On the following screen, select “Gmail”.
- For the event, select “Send Email” and click “Continue”.
- Choose your account. Depending on whether or not you’ve used Zapier and Gmail before, you may need to connect your account. Click “Continue”.
- Under “Action”, complete at least the following fields. Keep in mind that you can modify all fields after initial setup and prior to first real use including adding variables imported from the Calendly meeting.
- To = Select field “Invitee Email”
- From = Select your email address
- Subject = Enter the subject of your email.
- Body = Enter the subject of your email.
- Click “Continue”
- Test the action to make sure it works as intended.

Settings and fields for Gmail action. Test with a fake meeting first! - Go back and make the edits you’d like to your subject and body. Consider personalizing using the invitee first name, time and date of meeting, etc. You can also include a link to the event type if you want to offer the opportunity to schedule a new meeting.
Test the Zapier Workflow
- Go back to your Trigger step (Google Sheets). Under “Test”, pick your “No” record and click “Continue with selected record”.
- Continue through prompts and re-test your filter. For the “No” record, the filter should indicate that the Zap would not have continued.
- If you’re ready to start running real tests, publish your Zap to turn it on or click the toggle “On” button.
- To run another safe test, copy and paste your test row into a new row. While this Zapier trigger is “instant”, it can take a few minutes for the workflow to fire and for an email to arrive.
- Make any last adjustments to your workflow before going live - for reals!
Using the Zapier Workflow
- Go to your Scheduled Events page.
- Click on the “Past” tab or select a specific date range in the past using the “Date Range” tab.
- Feel free to add any filters using the “Filter” button.
- Click on the “Export” tab to export a CSV file. Unzip the file if needed before proceeding. Google Sheets can’t import a .zip.
- In Google Sheets, import the file by going to File > Import > Upload > Browse and selecting the file. Click “Open”.
- For this import, select “Append Spreadsheet” and then click “Import Data”.
As designed, the Zapier trigger will fire on new rows, the filter will only allow the Zap to continue if “Marked as No-Show” is “Yes”, and the action will be an email to your no-show invitee.
What if I’m not using Google at all? A similar Zap can be created for Excel (files must be on OneDrive for Business), Airtable, and other spreadsheet driven applications as well as many different email providers. Check Zapier’s App database to see what’s available.
I’m worried about emailing the wrong people. In the process of building this Zap, an overly confident Jillian actually messed up one very tiny thing that she shouldn’t have missed and did in fact send incomplete “hey you missed our meeting” emails to 37 people. To mitigate this happening, be sure to start with dummy data (meetings to you from you), test the filter both passing and failing, and test even more dummy data before adding in real customer data. And then start small until you are totally satisfied. Don’t be like Jillian and add in 8 months worth of Calendly scheduled events. For the super risk averse (we see you and feel you entirely and Jillian wishes she had been that person at 9am), you could use a “Create draft” Gmail action instead.
Is Calendly ever going to build in no-show workflows? Or add a Zapier no-show trigger? It’s definitely something we’re looking into and collecting feedback on. No promises or timelines, but definitely on our radar. Be sure to tell us about your use case as every bit of context helps!