Question

how to make calendly have a height according to the content displayed on mobile

  • 13 June 2024
  • 3 replies
  • 697 views

I plan to make calendly have a height according to the content displayed, so users don't have to scroll on their calendly embeds.

If you are using Calendly’s inline embed code you can add the data-resize=”true” property described here to automatically resize the scheduling page. 

Calendly will also post a “calendly.page_height” event to the parent window that includes the current height of the content (see here). If you aren’t using the embed code, you can add an event listener to update your code to dynamically change the height based on the Calendly content.


I use wordpress to add calendly widget, how to implement this method?


Hey there @Aji48707 -- great question! 

Firstly, I am going to provide all of the info needed to embed with Wordpress. At the bottom of this comment (scroll to the “Embed Calendly Using Elementor” section, just above the second RED BOX), I will also provide info on how to implement the code that might fix the scrolling issue when embedding with Wordpress > Elementor. I hope it helps! 

  1. You will need to know if you are using WordPress.com or WordPress.org. If you are unsure, follow these steps to verify:
    • Log in to the WordPress admin dashboard for your site.
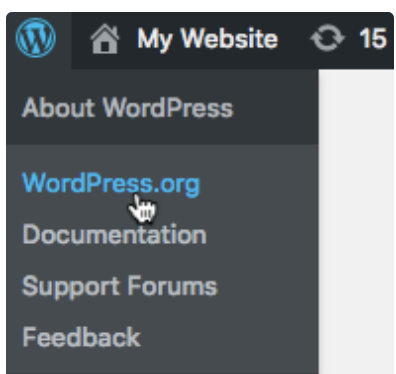
    • Hover over the WordPress logo in the top left corner of the page:


  2. WordPress.org users will see a drop-down menu appear with options.
    WordPress.com will not see a menu.
  3. You will need to generate your Calendly embed code. As a reminder, the embed code can be generated for either a single event type, or your account's booking page.
    • ​​​​​​WordPress.org supports all three of Calendly's embed options:

      • Inline
      • Pop-up text
      • Pop-up widget

Note

The Calendly embed code requires the use of JavaScript. If you have applied a theme to your WordPress.org website, the theme may not support JavaScript or may impact the appearance of the embed code.


Option 1: Embed Calendly on a single page

  1. Sign in to WordPress and visit the admin area.
  2. Go to Pages and decide which one you would like to edit, then select the + to add a new block.
  3. Choose a Custom HTML from the Formatting drop-down list, and paste your Calendly embed code.
  4. Preview Changes to ensure the embed cooperates with your website's theme before selecting Update to save.

    wpembed1.1.png

Option 2: Apply the pop-up widget across your entire site

  1. Navigate to the Appearance section and open the Editor.
  2. Locate the Theme Files sidebar to the right of the page and scroll to find the Theme Footer.
  3. Locate the </body> tag at the bottom of the footer. Just above the tag, paste the pop-up widget code from your Calendly account.

    wordpress4.gif

Embed Calendly on WordPress.com

Calendly's embedded widgets are only compatible with

WordPress.com plans that allow you to add plugins. If you do not have the ability to add plugins, you can add a hyperlink to your scheduling page directly so you can direct guests to your Calendly booking page.

Plugin enabled plans

  1. Navigate to the page you want to add the Calendly embed code.
  2. To add the Custom HTML block, select the + Block Inserter icon and search for “HTML”.

    add-a-custom-html-block.gif

  3. Once you’ve added the block, paste your Calendly embed code.

  4. Preview Changes to ensure the embed cooperates with your website's theme before selecting Update to save.

Non plugin enabled plans

  1. While editing one of your pages, highlight any text and select the Insert/edit link button from the toolbar.
  2. Paste the URL to your personal scheduling page, an event type page, or a team page. For an image, select the image and follow the same steps.

Embed Calendly using Elementor

Elementor is a third party page builder that allows you to easily customize your WordPress site. It is compatible with both WordPress.com as well as WordPress.org. Using Elementor, you can add the Calendly embed code to any WordPress page.

You can use this video link for a step-by-step guide to adding the Calendly embed code with Elementor.

  1. Add the Shortcode widget to the canvas. For more information, see Add elements to a page.
  2. In the Content tab, under the Shortcode section, enter the full Calendly embed code in the textbox area provided.

More on Elementor

Scrolling issue

We have seen that the Elementor theme automatically adds additional inline styles to the inline embed which causes scrolling issues on iOS especially. Please see below for more information on a potential fix for this problem.

If you have inspected the calendly-inline-widget div in the browser's developer tools and have seen that an overflow style has been added, that is likely the main cause of any weird scrolling behavior.

To correct this, you will want to prevent or override this style to make sure that the overflow or overflow-y is set to hidden.

It may not be possible to change the website builder's behavior easily (e.g. in Elementor), so we generally offer a way to override the CSS. That is where the example below comes in.

Adding overflow-y:auto to this element can cause the div element itself to scroll - this scroll is very small, so it can be hard to spot. Normally the scrolling elements are: your page and the iframe (if the height of the embed cannot contain all the content). When this style is applied, it adds another scrolling element behind the iframe which iOS especially does not handle well.

To fix this, you can add the following code directly beneath your Calendly code in the same custom code block:

<style>
.calendly-inline-widget { overflow-y: hidden !important; }
</style>

I hope this helps!